How to do freehand tracing with React Native?
Building Great Apps with React Native
Background
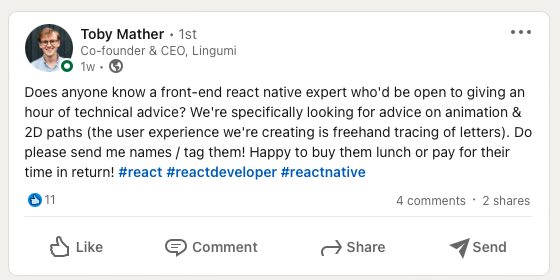
Recently I came across a LinkedIn post asking about freehand tracing with React Native.
It caught my interest and I was thinking about how would I accomplish it if it was me. And this is where the journey begins.
Initial Thoughts
The first thing that comes to mind was SVG which also makes it easy to collaborate with Designers. And with some tricks, you could make SVG animatable. But, SVG alone is not enough, we still have to deal with the tracing part.
So let's break down what tracing gonna need:
- Ability to draw and redo
- Identifying whether the tracing is valid
Drawing
When speaking of drawing, using canvas might be the easy solution. You could simply plot the to-traced SVG and draw around it.
Tracing
Then it comes to the tricky part, how do you validate it's a hand tracing? Let's look at an example of what tracing an alphabet letter would look like.
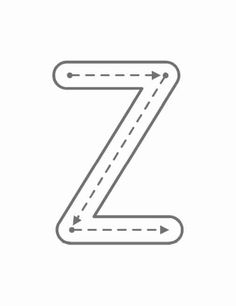 |
| Image Credits - slimzon.com |
A valid tracing should meet the following
- Tracings should be within the border
- Tracings should be recognized as an alphabet
Tracings should be within the border
This reminds me of the geofencing technique, which in my early career I did on location-based service. Identifying whether certain geolocation is outside of the geofence. In the end, it is all algorithms and math.
The concept could be borrowed, with some algorithms applied to determine whether the tracing is within the border.
Tracings should be recognized as an alphabet
Nowadays, text recognition can be done by cloud services such as Firebase or locally with pre-trained ML models through an ML kit. Out there should already exist some text-recognition React Native package that could be applied.
Sum up
A short summary of what we need so far
- SVG
- Canvas
- Algorithm for within-border check
- Text Recognition
Get hands dirty
SVG & Canvas
The fundamental building block for this would be the Canvas. Although there exists plenty of Canvas packages for React Native, we also need to consider performance.
After some research, I decided to go with rn-perfect-sketch-canvas. Which is easy to use and well-maintained. The highlight of this package is that it uses Skia Graphics Library, so we shouldn't have much concerns on the performance side.
rn-perfect-sketch-canvas
To display a Canvas is fairly simple
import React, { useRef } from 'react';
import { StyleSheet, SafeAreaView, Button } from 'react-native';
import { SketchCanvas, SketchCanvasRef } from 'rn-perfect-sketch-canvas';

export default function App() {
  const canvasRef = useRef<SketchCanvasRef>(null);
  return (
    <SafeAreaView style={styles.container}>
      <SketchCanvas
        ref={canvasRef}
        strokeColor={'black'}
        strokeWidth={8}
        containerStyle={styles.container}
      />
      <Button onPress={canvasRef.current?.reset} title="Reset" />
    </SafeAreaView>
  );
}

const styles = StyleSheet.create({ container: {flex: 1,}});
Within the canvas setup, simply long press to draw
The package provides some useful methods, which come in handy
reset()addPoints(points: [x, y][][])=> Drawing from point of groupstoPoints()=> Get the array of point groups that got drawn in the canvas.toImage()=> Get a snapshot from the canvas in the surface
SVG
The next thing to do is to display the SVG on Canvas. The package we are using provides a method addPoints(points) to plot x&y coordinates on the Canvas.
We'll be using this SVG for the letter tracing
<svg xmlns="http://www.w3.org/2000/svg" viewBox="0 0 110.4 147.44">
    <path d="M9.06,27.66c0,4.74,3.18,7.38,7,7.38A6.15,6.15,0,0,0,22.2,30.6l8,2.46C28.92,38.28,24,43.44,16,43.44c-8.88,0-16-6.54-16-15.78A15.39,15.39,0,0,1,15.72,11.82c8.22,0,13,5,14.34,10.38L21.9,24.66a5.86,5.86,0,0,0-6-4.44C12.12,20.22,9.06,22.86,9.06,27.66Z" />
</svg>
The d attribute is a string that contains a series of path commands that define the path to be drawn. Here, we'll need to do some conversion work, processing the d to coordinates.
Luckily, Spotify had built a tool for this conversion.
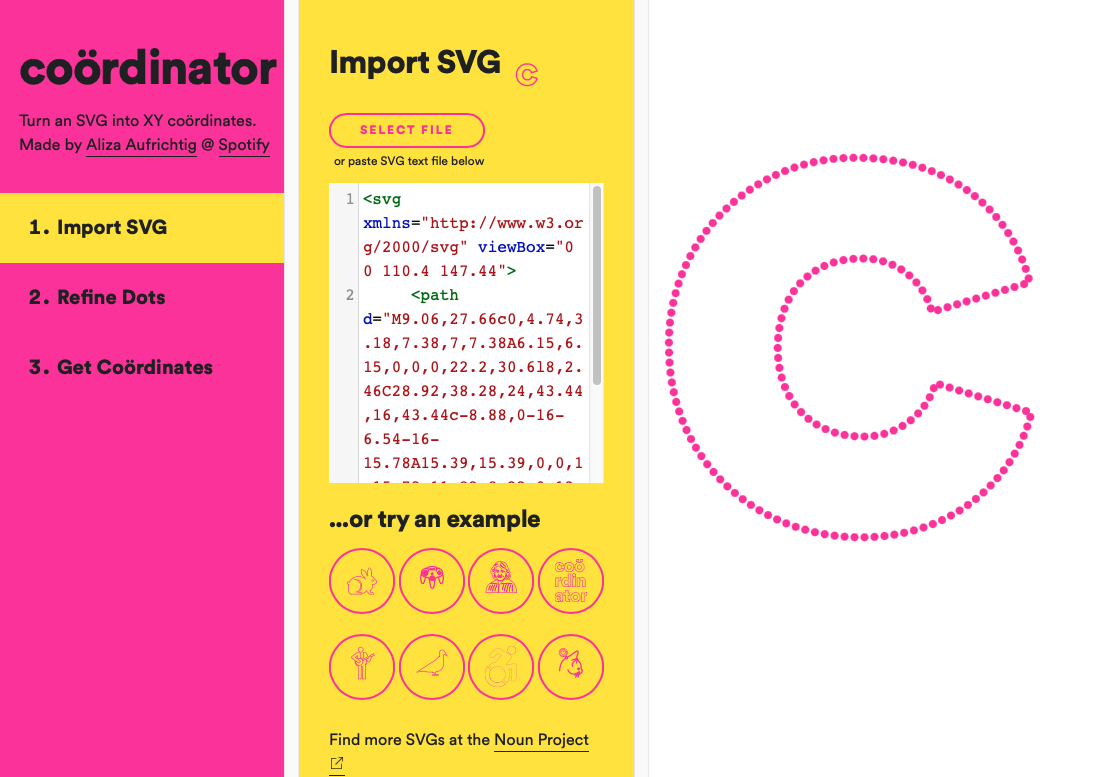 | 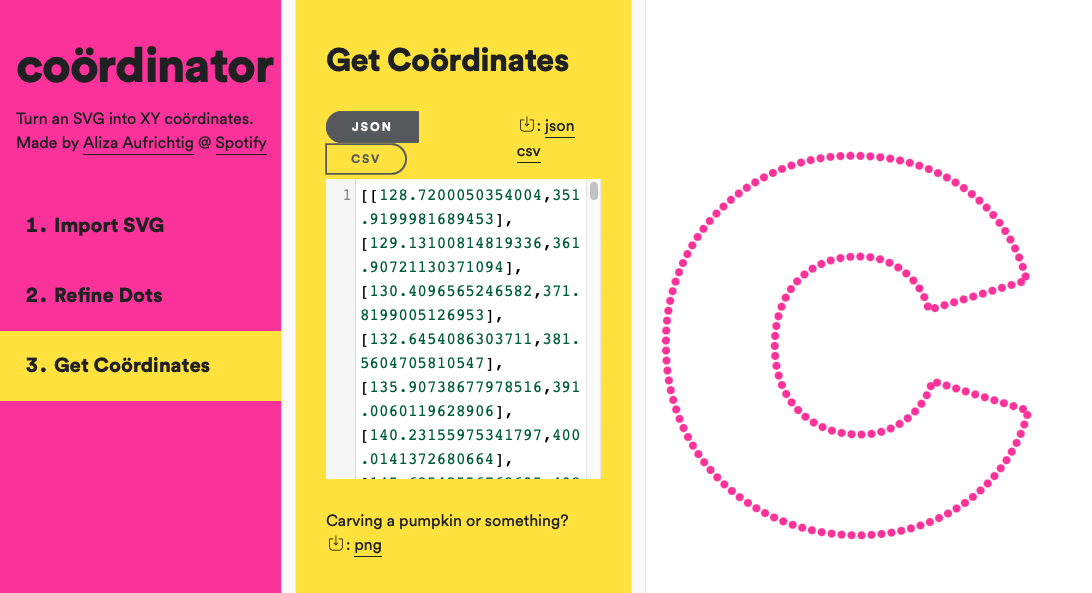 |
| Step 1. import the desired SVG | Step 2. Get the coordinates in JSON format |
The final step is to apply points retrieved from the tool and use addPoints().
const guide = [
  [
    [128.7200050354004, 351.9199981689453],
    [129.13100814819336, 361.90721130371094],
    ...
    [130.4096565246582, 371.8199005126953],
  ]];

canvasRef.current?.addPoints(guide);
Border Check
The next topic on the list is to figure out which algorithms to apply for the border check. This problem is equivalent to determining whether a point is inside a polygon. After some digging, I decided to go with the package point -in-polygon which is based on this algorithm. Since the package is straightforward to use and the algorithm looks solid. So why not?
Usage example
import pointInPolygon from 'point-in-polygon';
const polygon = [ [ 1, 1 ], [ 1, 2 ], [ 2, 2 ], [ 2, 1 ] ];

console.log(pointInPolygon([ 1.5, 1.5 ], polygon)); // true
console.log(pointInPolygon([ 4.9, 1.2 ], polygon)); // false
console.log(pointInPolygon([ 1.8, 1.1 ], polygon)); // true
Now on the Canvas should exist two groups of points after the user's input, one is our guide and one is the hand tracing. For the border check part, we are only interested in the user's hand drawing part. To retrieve it, we do a diff between the guide and the group of points from toPoints(). Once you have the user's hand drawing group of points, we validate them one by one. Only if all the points are valid, do we consider the whole hand tracing valid.
import {diff} from './utils';
import {guide} from './constants';

const handTracing = diff(guide, canvasRef.current?.toPoints());
 let flag = true;

 handTracing.map(point => {
   flag = flag && pointInPolygon(point, guide);
  });

 Alert.alert(flag ? 'Within Guide' : 'Outside Guide');
Text Recognition
Now, the final step of the POC is Text Recognition. I found an on-device Text Recognition package that uses Google's ML kit which is react-native-ml-kit
import TextRecognition from '@react-native-ml-kit/text-recognition';

const result = await TextRecognition.recognize(imageURL);

console.log('Recognized text:', result.text);
Here we'll need an extra step, before applying the recognize() method. The imageURL is a file path of the image. While the toImage() method from rn-perfect-sketch-canvas is just an image data, we need to store it as a image first. And here's when we introduce the react-native-fs to achieve writing files to the filesystem.
import RNFS from 'react-native-fs'

const path = RNFS.DocumentDirectoryPath + '/handTrace.png';

// write the file
RNFS.writeFile(path, canvasRef.current?.toBase64(), 'base64');

const imageURL = "file://" + path;
Proof of Concept
The following is the POC while we put all things together.
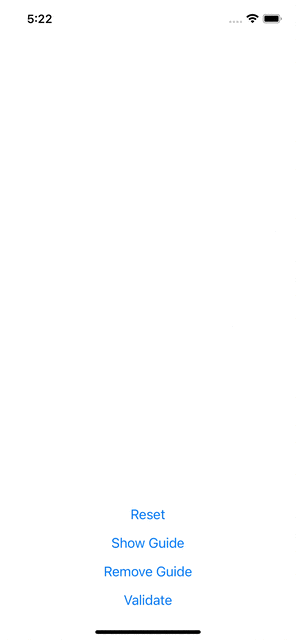 | 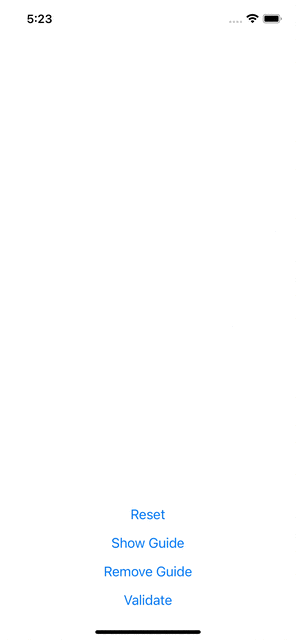 |
| POC 1. Within border | POC 2. Outside border |
Notes: In this POC text recognition is not included, I met an issue that seems like GoogleMLKit for iOS doesn't yet support Apple Silicon. If you're also using M1 mac, in the meantime you might want to go with other on-device text recognition libraries or the Cloud API solution.
Conclusion
A recap of what we did so far:
- ✅ Ability to draw and redo the hand tracing
- ✅ Display the to-traced SVG on the Canvas
- ✅ Ability to determine whether the hand tracing is within the border
- ✅ Storing the hand tracing to the file system
- ⚠️ Text Recognition
It's quite a fun journey to put together this proof of concept.
Thanks for reading this far, hope you enjoyed it too.